Showing posts with label Tiny House Renovations. Show all posts

Sunday, April 15, 2012

Finally!! It's done! Well, mostly.

It's been almost a month since my last post. We've been so busy on actually getting the house ready for occupancy that there just wasn't time to write about it. I'll get everything caught up now. It's been interesting, frustrating, rewarding, exhausting, enjoyable, and scary. In the end, though, it's all good. We had a ball. Our "crew" of workers were not always knowledgeable about the things we asked them to do but were always willing to follow directions when they didn't know and give it a try.
I found that a big key to not driving yourself, and everyone around you, insane is to be flexible and not spend too much time making decisions. My first preference for the kitchen counter was Formica that we would buy and glue on our base. When we went to the  big box store, an hour and a half away, that was supposed to have such a big selection of the stuff we found only six types and they were pretty bad. So, we decided on ceramic tile. When we got the Luan plywood glued down on the base in preparation for the tile my husband convinced me that it was too pretty to cover up so we sealed it with polyurethane instead and didn't use the tiles. It will wear as well as the Formica and really is very pretty.

We got the hole in the floor closed up with in a couple of days of my last post. Unfortunately, Don was out of commission for three weeks after his work under the floor. He had some sort of flu bug that left him weak and tired for days after it ran it's course.


Don had started building, under Danny's direction, the bar part of the cabinet. When he couldn't work for those weeks we hired Mike and he and Danny finished that and built the upper cabinet and the extension next to the sink cabinet. These were all my designs, Danny's plans and Don and Mike's labor.
Since someone stupidly took out a bearing wall to put that useless 3/4 wall in we had to jack up the ceiling and support it somehow. We wound up putting in a 2x12 plate with two 2x4's sandwiched together on edge for strength backing it up.

 Then on the walls under the ends of the plate we put 2x12's just as an extra support. It's looks good and works great. The ceiling and rafters are stable and won't be settling anymore.  As you can see in this picture we've finished the reconstruction on the floor and wall and have closed the holes up.

I wrote in an earlier post about the over sized space stealing box hanging in the corner of the red bedroom that was covering a small vent pipe and how we had made that much smaller and slanted it. I still need to trim it out but this is what it looks like now. You can just barely see it in the picture and it isn't that noticeable in actuality.
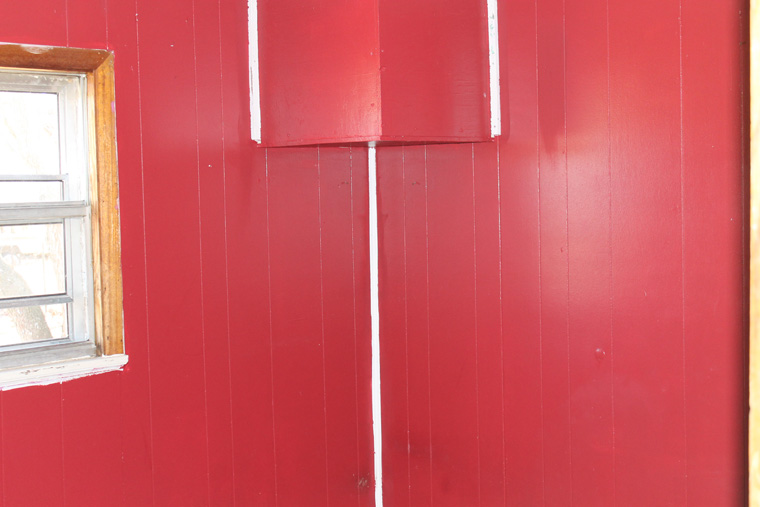


I just don't understand the reasoning behind the shoulder height box, way over sized for it's purpose, protruding awkwardly into this tiny room.

There are still a few things to do inside and several outside. Inside, the kitchen cabinets still need some of the doors hung and there is a small amount of trim that still needs to be painted and put in place. This is all trim that had to be replaced because the original was just to bad to reuse or some trim that I decided to put in place for a more finished look after we were done. Then there's the edging trim around  the counter top. I'm going to have to order that online yet. I still have to paint or cover the floor in the long narrow room in the back of the house. The doorway is off the kitchen and it runs the length of the house ending in the utility alcove on the other end. At least part of it could be used as living space. And then there is the problem of the space for the washer and dryer that needs to be dealt with. Washer and dryers are pretty standard size wise. This alcove was obviously built for regular sized units but whoever built the area made it a half an inch too small. The drywall tape on that end of the room had to be stuck back on the wall and the floor is small scraps of plywood pieced together. (I'm sure you all know the kind of unethical people that do this kind of work. They cash the checks quickly after being paid for their services before their work starts to fall apart.) So we are going to have to take the window trim and baseboards, and possibly a section of the drywall, out to get the units to fit. If the drywall has to be removed we'll have to replace it with something very thin, maybe a piece of painted luan.

But we've finally gotten to the point of occupancy. Our renter moved in Thursday and is working around the things we have yet to finish. The following pictures are mostly of the kitchen area because that's where most of the work was done.


I am most proud of this. You can see the new counter and cabinets, get a glimpse of the beautiful flooring, and see into the back bedroom previously of the hanging box and lurid red walls.


This is a shot of the finished counter top and the back splash. And the bottom of the new wall cabinet.


The kitchen from the front door. Notice the door in the counter that opens into the living room. Unusual, yes, but I didn't want a cabinet with dead useless space in it. What's the point of putting a cabinet in that you have to crawl into to access.


This is, of course, the sink counter. New receptacle on this end.


The view from the back room through the kitchen to the front door.


Well, that's all I've got to show you now. Maybe, after the furniture is in our renter will allow me to take some more pictures. It's up to her though. She has been patient with the delays we've experienced and understood that, no matter what our expectations were and are, reality can not be changed. The house wasn't ready when we expected it to be and she didn't stress out about it. I didn't either so we got through it with out problems. Some inconvenience, yes, but then, sometimes that happens in life. 

As I've spoken to people in town about what we were doing with this tiny house word has gotten around. I had three people inquire about renting this house in the last two weeks and had to tell them it's taken. Not to bad in a town of two thousand with other rentals available. They all wanted to know if we have other rentals. We don't. Yet. Several times, during this process, I've sworn I will never do this again.............  At least not until next year................ Unless another really good deal comes along................ Really!

Sunday, March 25, 2012

Making Progress And A Big Mess

Replacing Foundation Baseboard

Repairing Inside of Exterior Wall


It's been a few days since my last post simply because almost every waking minute has been spent at the tiny house working. I have white paint everywhere including my hair and eyeballs. But we have made significant progress, thank goodness. The week didn't start out good. One of our workers came down with  a bug that put him out of commission for the week. Another was unavailable on Monday and sick on Wednesday. Fortunately, we found someone who is good at carpentry, willing to do any kind of work, and was available. It set us back a bit but not as much as it could have.

I think I left it last time with a hole in the floor caused by water leaking in through improperly installed duct work. When we got into it we found a good amount of damage to the floor and wall. Actually, the base board that rests on the foundation was rotted in that spot. So that had to be cut out back to good wood so it could be replaced.
This is the mess we uncovered when we started investigating the buckled panelling below the cold air return. The black area below the lower left corner of the return is building paper exposed when the rotten wood was pulled away.                                                                                            


The soaked wood had to be dried out and we treated it and the replacement peices with a Borate spray.
 The new wood is the replaced piece that rests on the foundation and we used a piece of oak plank from the wall we took out to replace the outside wall board that was rotten. Once that was in place the rest of the area was framed in and reinforced. Getting the frame work in place was a bit of a problem. It was a very awkward area to reach. So Don, our worker and friend, after trying several different ways of doing this finally decided this was the only way.
We have often been grateful for Don's help, but, I think this goes above and beyond what most would do on a job. There just is no way I could do this.
I was uncomfortable just looking at him down there..

Blindly reaching for a screw because he couldn't sit up far enough to see where they were.

And done!! Poor guy. He was definately relieved to get out of there.
None of this damage would have happened if the installers of this outside furnace and a/c unit had done it properly. Like I said before, I don't know if  laziness or greed or stupidity was the cause of this screwed up mess but, off hand, I'd rule out stupidity. They'd have to be really profoundly dumb not to notice that the vent was sloped toward the house instead of away. Even stupid people know that water runs down hill. Or that duct tape isn't waterproof. That leaves lazy or greedy. Or, probably, both.  


Sunday, March 18, 2012

Building Counters and Fixing Crappy Refinishing Work

I sort of left you hanging while we talked about Sage the Parvo survivor and days off and making soap and such. But, I'm excited about the progress on the tiny house and wanted to show you what has been going on. A lot of what we havehad to do has been fixing totally crappy refinishing work from the last few remodels on the house. I don't know of it was incompetence or laziness but most of it is horrible.

The counter that's going to be between the kitchen and living room is coming along nicely. As a matter of fact it's almost done except for the top. I've thought about using tile for the top but can't find anything  in our price range that I like. So we've decided to use regular laminate. We are going to do it ourselves to save money and because it's a nonstandard size.
                                                                       Anyway, here is the base going together:

This is the living room side. There will be a door on this side. A little unconventional, I admit, but better than trying to access a deep around the corner cabnet space that's under the counter top  from the kitchen side. Especially since there will be an eight inch counter top overhang on that side. I've designed it that way for knee room if the renter doesn't want to fit a table somewhere in the tiny living room or smaller kitchen.

This is the kitchen side and base. If it works out the way we expect we are going to round off the corners of the top for easier passage. I really hate sharp corners digging into my sides. The doors have to be made yet. All of this comes apart to put the flooring in place. I'll get it primed and painted while it's in pieces


This box descending from the ceiling in one of the bedrooms was very large for the area. A cube, about 2' X 2', with the bottom only 5' above the floor it was an awkward obstacle in the small room. Danny figured out it was covering the vent that goes into the laundry area on the other side of the wall.  
                                                                                                                                    
When we took it apart this is what we found. A lot of wasted space making an already small room even smaller.
So this is what we did. You can see, by the white walls that were under the boxed in area how much smaller we made the cover. Since it's also now angled and no longer hanging out in the room the space under it becomes usable again. The BOX IN THE CORNER no longer dominates the room. We'll cover the plywood with a bit of paneling and it'll get painted along with the rest of the walls and will almost disappear. At the very least it will be out of the way.  It's difficult to immagine what the "remodlers" who originally built the cover like that were thinking. 

It's getting late and I'm tired. I hope to show you the problem we found when we checked under some buckled paneling in a post tomorrow. Again, it was from an improperly installed furnace duct leaking rain into a wall. There has been a surprising amount of shoddy work done on this poor little house. Fortunately, none of it did extensive damage that can't be fixed.

Thursday, March 8, 2012

Charming Sage and Saggy Ceilings

It didn't take Sage long to completely charm our friend, Don. He's helping us on the little house and saw Sage for the first time  since she has recovered. And within a few minutes this is where she was.

Snuggled up against his side under his coat, it didn't take long before her little head started to droop and her little eyes started to close. This is how she finished waiting for her breakfast.


Actually, one of our older dogs, Toby, really likes this new puppy. Toby is maybe 13 or 14 years old. He's arthritic and sometimes just doesn't feel very good but has always enjoyed playing with our two little six year old terrier type dogs (also rescues, but, then, so was Toby). I think, however, that Toby thinks Sage is a toy. A really fun toy. It's good for him to get all this extra exercise and he is having such a good time with her.

Danny and Don got the support beam up between the living room and the kitchen yesterday and today. It looks pretty good and has helped the ceiling tremendously. I'm pretty sure the half wall that was there was originally a full wall with a doorway between the kitchen and living room. Remember this house was built in 1940 when most rooms had walls between them. Anyway, whoever did the remodeling was really bad and didn't know much about what they were doing. They cut the wall down and didn't put anything in for support. It's a bearing wall which means that it's supposed to support part of the weight of the roof. Over the years with the wall removed and no brace installed the ceiling started to sag. They got most of the bow out but we are hesitant to try for more. We don't know what kind of damage forcing it further might do.
 The original ceiling was drywall with insulation above it. For some reason someone decided that 12x12 acoustical tile would be better so they put that up. Unfortunately, they didn't bother to take the drywall down and drywall is heavy. That was adding to the sag overhead. It's taken care of now but I am going to have to work a support beam into my plans for the counter between the two rooms. And painted and trimmed up the overhead beam will just become part of the charm of the cottage. 

Tuesday, March 6, 2012

Sage and Deconstruction


Sage is doing very well. She’s gaining weight everyday and is active and playful. Now we’re working on house breaking. It’s hard to do when we’re so busy with so many things, especially the rental house.


 We've made some progress on the house. Below you can see the old wall covering the chimney and, also, the half wall between the kitchen and the livingroom.


The old non functioning chimney was a hanging flue. It hadn't been used in years but for some reason was left in place and was just wasted space. Space that was desperately needed in the minute kitchen. It took up way to much space in this tiny house and the half wall was useless. It opened up the space somewhat but still caused the kitchen to be more cramped than necessary. Underneath the paneling was wallpaper and then just oak boards.


Taking all that out left us with a hole in the ceiling and one in the floor where the wall had come through. We knew that the ceiling was sagging in that area and would need to be supported. Whoever put that up didn't have a clue how to do it. Or was just too lazy to do it right. So, It's going to need a little more work than we thought. It's a hassle but not insurmountable.
Finally, here is the space with all that gone. Looks a mess, right? It is. But, I think it's going to turn out quite well. Cabinets, countertops, then new flooring we just got today. It's going to be a cozy little home. We're working there tomorrow. I think we'll start painting in the bedrooms while Danny and our handyman take care of this.


Monday, February 27, 2012

Introduction and Stuff.

My husband and I live on a farm in very rural South Central Missouri. We have a couple of goats to keep the brush down and some chickens for eggs. We also have eight cats and six dogs that are family to us. Our garden provides produce which we enjoy fresh, in season, and put by (can/freeze/dry) for the rest of the year.

Danny works on computers and does the mechanical work on our vehicles and farm equipment. He also takes care of any problems and repairs on our furnace and a/c, any plumbing work, and carpentry that’s needed. He was disabled by a heart attack and had a quadruple by-pass years ago. What he isn’t physically able to handle now he can direct others to do. Because he has a defibrillator he is no longer able to weld so is teaching me to do that. I wanted to learn anyway because I want to make garden trellises. We have someone who comes in to help when there is something that we can’t handle together.

I am building and maintain our online businesses. One shop, SeventhChild, is for my unique handmade jewelry and hand engraved glass. I even have a couple pieces of my punched metal work there. Then there’s our 7thStash shop where I have craft and art books, craft and sewing patterns, and a few supplies. Also, I am building a vintage shop, SundayzChild, that will have glassware, crockery, material, notions, and odds and ends. Eventually, there will also be Ruby Glass and collectable Tea Pots available. These are all on Etsy. I am the president of our local Farmer’s Market which will be starting up the first Saturday in April. This year Danny and I will be selling our handmade soap, a few herb plants, my heavy wire hooks, in various lengths, for hanging plants and feeders in trees or where ever, maybe some of our free range non GMO eggs, and other things that we make.

We both garden, make the soap, and tend to the animals and chickens.

We came to the conclusion, last year, that we needed to increase our income with something that was reliable and steady. We decided to buy a rental house in town and found one that we liked last Fall. It's a tiny house. 564 square feet. 


The tiny house we bought for a rental property.
When I'm finished with it I want it to be cottage cute and am looking forward to making it that way.

So, this will be about the process of buying the house from HUD (an exercise in frustration and perseverance) and turning it into a cute little comfortable home for someone to rent. We’ll be replacing flooring and doing a little remodeling. There’s an old flue that needs to come out and we’re going to replace a wall with a counter between the little kitchen and the living room. I'm considering different options for the kitchen counter tops now. I may go with ceramic tile. There’s a bit of building and some repair outside that we need to do and a lot of painting and cleaning inside and out. Also, I’ll probably write a little about the other things we do, our fur family and other animals, the work we’re doing on the house we live in, our garden, projects, artwork, crafts, other adventures.

I'm just getting the hang of adding pictures to this so I will be adding more soon.